

How To Clean A Mikuni Motorcycle Carburetor
When it comes to carburetor issues, it can be a nuisance trying to take it off the motorcycle, taking it apart, and figuring out what exactly is causing the problem. Though they're a simple mechanism, they have tiny parts that's could easily be lost when taken apart.
It would be really nice to be able to clean a carburetor without having to go through the hassle of removing it in the first place. And the best part is that it's completely possible to do so.
So how do you clean a motorcycle carburetor without removing it? To clean a motorcycle carburetor without removing it, you'll need to remove the bowls at the bottom of the carburetor. Once the bowls are removed, spray some carburetor cleaner up inside, wait a few minutes, then spray again to ensure coverage. Then replace the bowls and start the motorcycle to assess how it runs.
I have cleaned over a hundred carburetors over the last few years and I have cleaned them in every way imaginable. I've had success cleaning some without having to remove it and this is how I did it.
Cleaning Carbs Without Removing Them
It's no wonder people are researching how to clean the carbs on their motorcycle without having to take it off. A lot of issues associated with how a motorcycle is running is usually because of carburetor issues and the fact that they're not clean inside. Issues like this that frequently happen can make cleaning a daunting task if you have to remove it every time.
Most motorcycle carburetors sit behind the engine towards the center of the motorcycle. A lot of people don't want to have to deal with taking the throttle cable off or deal with the intake boots. In order to clean it without taking it completely off the bike, you'll need to first take off the air box or pod filters. This is easily done and they can easily be reinstalled when you're finished.
Removing the air intake filters will then expose the back of the carburetor so you should be able to see the butterfly valves opening and closing when turning the throttle. Removing these gives you better access to the carburetor. Now you'll need to take off the bowl at the bottom of the carburetor.
There's usually a center bolt or a few screws around the side of the bowl that will need to be taken off in order for the bowl to detach. These are very simple to take off and should only take a few minutes. Also make sure you turn your petcock to the off position so you don't have gas running out. Have some paper towels handy because you'll likely have a little bit of gas that leaks once you take those bottom bowls off.
When the bowl is off, you can attempt to spray some carb cleaner up inside. Do a few sprays every few minutes to let any dirt and grime become loose. Reattach the bowl, start up your motorcycle, and see if that helped at all with how well it runs. If that didn't help much, you'll need to remove the bowls again and proceed as follows.

Once the bowl is off again, you'll see some floats up inside the carburetor (similar to the floats you see in the tank of a toilet tank). These floats rise when the bowl fills with gas and tells the carburetor to shut off the fuel valve to prevent it from overflowing.
You'll need to take off the float as well in order to access what's behind it. These are attached by a small wrist pin that you should easily be able to push through to detach the float. When you remove the float, there will be a rocket ship shaped part that is connected to it with a rubber tip. That tip is what plugs up the line to prevent overflowing. The float and this rocket shaped part will come off together.
While the floats are out, I usually like to test them and make sure they're still good. Get a bowl of water and put them in to see if they actually float. If they don't float, you'll need to get new ones as this could cause mechanical issues with your motorcycle later on.
Now that the float is off, you'll need to look up inside the carburetor and unscrew the jets. There's usually at least two in there; one is a primary jet and the other is a secondary jet. Look through the jets once they're out and make sure you can see through them.
These are easily clogged especially when ethanol gas is used. Clogged jets are the number one reason a carburetor doesn't work right. To learn more about the right type of gas to use on your motorcycle, see my article here.
Clean out the jets whether or not you can see through them. This will ensure you're getting out any gunk that may be building up inside that you can't see. Use carb cleaner a few times at several minute intervals to make sure you get everything out.
Now you can spray carb cleaner all over the carburetor. Spray up inside again and even spray some on the outside. Wait several minutes before reinstalling all the parts again so the cleaner has time to clean and drip off all the dirt. Reinstall the jets, the float, then lastly install the bowl on the bottom.
You can now try starting your motorcycle and make sure your cleaning was thorough by seeing how well your motorcycle runs. It's okay to keep the air intake filters off for this stage in case you need to access the carburetor again. Once you deem the carburetor is clean, you can install the intake filters.
How Often You Need To Clean The Carbs
You'll often hear of the routine maintenance you need to perform on your motorcycle with the different components, but people often get confused with the type of maintenance you need to perform on your carburetor.
It's a good rule of thumb to get the carburetor tuned about every two years, but there's really no other routine maintenance you'll need to perform on your carburetor. Taking a carburetor apart is a pain and it's really okay to only clean it out when you feel like it needs it. For some that could be every few months, others it could be every few years.
Those who regularly ride their motorcycle will require much less cleaning sessions on their carbs than those who don't ride them as often. Regular or frequent rides is almost seen as a cleaning mechanism in itself.
Those who ride less will notice they need to clean their carbs more often because dormant motorcycles tend to get built up grime and dirt inside the carburetor much more quickly. See my article here to learn more about what happens when a motorcycle sits for too long.
Signs That Your Carburetor Needs To Be Cleaned
Carburetors are pretty good at communicating to us riders that they need to have a good clean. There are a few obvious signs you can look for that will indicate a clean is needed.
As I had mentioned earlier, the jets are vital parts to the carburetor's functionality but they are often clogged and will cause some mechanical issues for your motorcycle.
Signs such as backfiring, sputtering, poor idle, and just running poorly in general are common signs of a dirty carburetor. Any time I am experiencing any of these issues I will first clean the carburetor because that is the culprit about 75% of the time.
If you have cleaned the carburetor and the motorcycle is still sputtering, see my article here for additional reasons why a motorcycle may sputter.
What To Do When Your Cleaning Wasn't Enough
I am all for saving as much time as possible when it comes to maintenance on a motorcycle. Cleaning the carburetor without having to take it off saves a lot of a time and effort, especially if it ends up taking care of the problem.
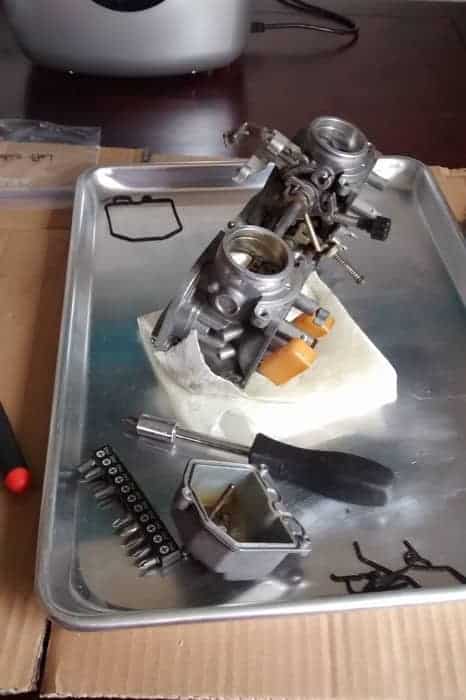
However, sometimes a quick clean like this doesn't always work. There may be some other underlying issues within the carburetor that you may need to look at. This, unfortunately, means you'll need to take the carburetor off the motorcycle.
A lot of people are intimidated with taking apart a carburetor. There are lots of little parts to them that can easily be lost. But the good news is that there are countless forums and videos online that can teach you how to disassemble and reassemble the specific carburetor you have.
To get the best results, I suggest you take your carburetor apart and put it in an ultrasonic cleaner. I recommend using this industrial grade ultra sonic cleaner (link to Amazon.com). This is the one I've used for dozens of carb cleanings and it does an excellent job.
All you really need to do is buy an ultrasonic cleaning solution and place the part inside the device, turn it on and let it do it's thing. You'll notice a high ringing sound so you'll maybe need to put it in a room you don't plan on staying in if that type of sound annoys you. I like this specific ultrasonic cleaner because it has a heater that heats up the solution for that extra thorough clean.
The ultrasonic cleaner will do all the cleaning for you. You don't need to do any cleaning before or after using it. Once it's been inside the cleaner, you can reassemble everything. Depending on the size of your carburetor, you may need to do a few different cleaning sessions to ensure all the parts are cleaned.
Also note that if any of the gaskets look worn when you take your carburetor apart, you should purchase a new carburetor rebuilding kit. These are inexpensive kits that come with new gaskets and will ensure good functionality in the future.
I have created a video series about restoring motorcycles from start to finish and within this series includes a detailed 25 minute video on how to clean and rebuild carburetors. This series also includes other hard-to-tackle components such as body work and electrical. I give dozens of tips and tricks that you won't find anywhere else online. Click here for more information if you're interested in viewing multiple videos that will help fix up your bike or if you're interested in completely building your dream motorcycle!
Related Question
What is the best carburetor cleaner to use? There are many brands out there that are excellent choices to use for cleaning your carburetor, including the generic brands. Carb cleaners that contain chlorine are more abrasive and provide better results.
How To Clean A Mikuni Motorcycle Carburetor
Source: https://motorcyclehabit.com/how-to-clean-a-motorcycle-carburetor-without-removing-it/
Posted by: thompsonkimmilloof.blogspot.com
0 Response to "How To Clean A Mikuni Motorcycle Carburetor"
Post a Comment